The next big task was fuel tank removal. I had no idea how much fuel was really in the tank and I'm sure not going to trust any of the gauges in this car yet. Thanks to the Haynes manual I learned the proper way to drain the tank: remove the guard plate underneath the car and remove the fuel hoses from the bottom of the tank, draining into a suitable container.
I was unsure how much fuel was in there but I knew it was more than any suitable container I had. My plan was to find a good spot to pull the fuel line loose and let 'er rip, and replace the line when the container filled up, drain the container and repeat until done.
I hate working with gasoline, it makes me nervous. I can just envision a spark somehow being created when I'm covered in it from trying to replace a draining fuel hose when my suitable container is full...
As a side note - in the era this Haynes manual was written, they recommend using gasoline for cleaning rubber gasket bits off of bodywork in some places; good luck finding a shop manual for a modern car that recommends that! Kids, don't play with gasoline, seriously.
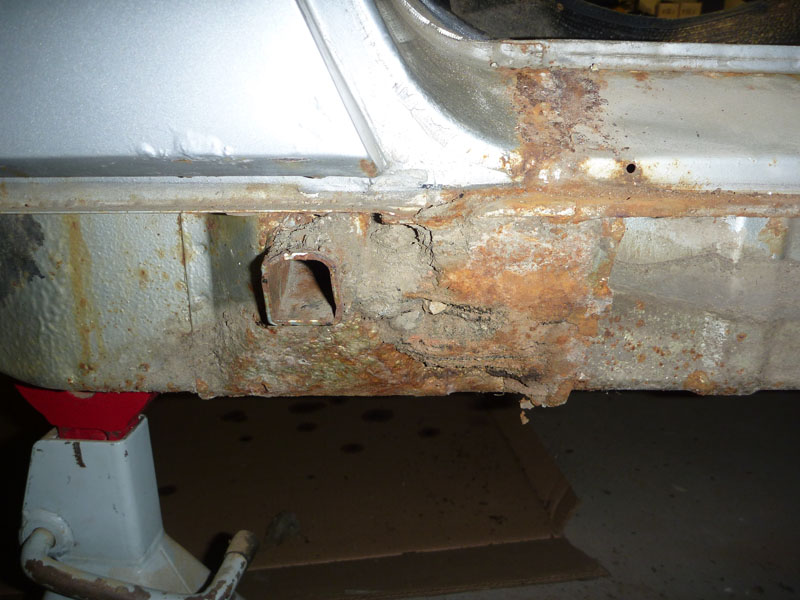
Anyway the protective guard plate under the car is a roughly 9 inch long 3 foot wide piece of metal bolted to the body underneath, with rubber gaskets along the long sides to try and seal it a bit with the car. It's really the only removable piece of metal on the bottom side of the car near the front end, relatively easy to find :-)
This piece protects some important elements from road objects: the rack-and pinion steering assembly and brake master cylinder being the most obvious ones. I had to use an impact wrench to loosen the large rusty bolts on the back side. The front side bolts had been replaced with some shiny new hex-head metric bolts. These are some of the few bolts that have been replaced by some previous owner that have been metric - usually I can tell the replacement bolts by the fact they used non-metric sizes.
Let's see what's under here...
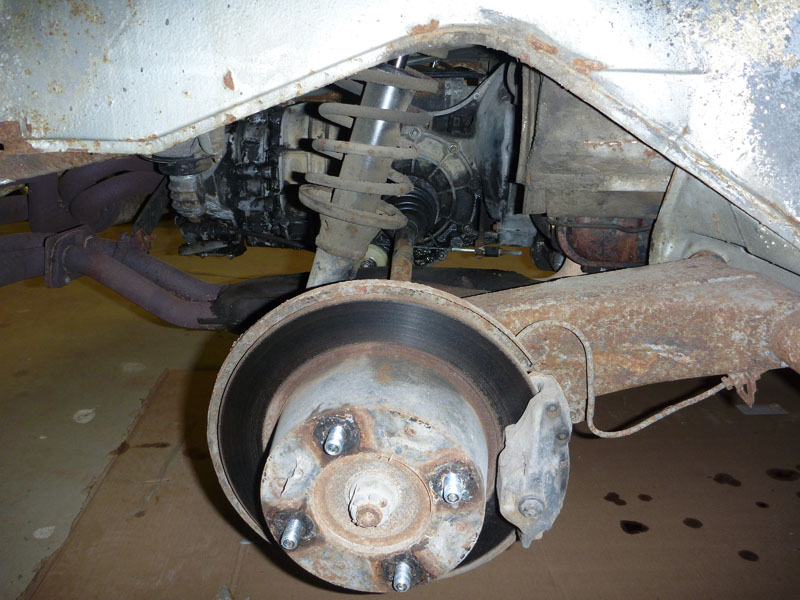
The brake master cylinder! This is the first car I've had where the brake master cylinder was not under the hood somewhere. The fluid reservoir is under the front hood but the lines run right down to the master cylinder here. It's got two "circuits" for fluid, one for the front and one for the rear brakes. An electronic switch/sensor is supposed to be connected to that middle post but of course on this car, it is not. The black wire above the master cylinder in the pic is the taped-off connector that's supposed to go there. Nice.
What's this? A non-vintage piece - aftermarket fuel pump.
Typical lovely wiring through the bulkhead there. The bar in the middle of the next pic is the rack-and-pinion steering assembly. The steering wheel eventually connects to this center area through some rods and u-joints and the pinion (a gear) winds along the toothed rack translating your rotational motion of the steering wheel into linear motion. The linear motion works on some tie rods that connect to the front wheel hubs/suspension (next pics).
The top of this next pic shows the rubber boot protecting the end of the steering rack and tie rod assembly. You can see where the tie rod attaches directly to the front steering knuckle (this is passenger side). Looks like I have a nice stack of 5L mini-kegs in the background too.
Driver side suspension view:
Shot towards the rear of the car. Note the floor plate that Cletus welded in for the driver's seat area.
This hole leads to the bottom of the fuel tank. Rather than try to disconnect the hose from the fuel tank itself up through this hole, it was much more convenient and logical to disconnect the feed line from the aftermarket fuel pump. Finally something easy!
Here's is my "suitable container" for gasoline - an enduring legacy from our dearly departed cat. This is a "small" litter bucket, the larger one barely fit under the car and didn't give me enough clearance to safely reach the hose connection. Once I took it off, the gas flowed rather strongly, especially when I took off the gas cap on top of the tank.
Ahhhh....
This honestly did make me have to go to the bathroom - fortunately there's one 3 feet away from where I was working. Kids - always build a toilet into your shop plans.
So...there was a LOT of gasoline in this car. I filled this kitty litter container 2.5 times! Each time it got full I put the hose back on the fuel pump connector, poured the gas into a real gas can, moved it over to the tractor and poured it into the tractor tank!
After all the fuel was out of the tank it was pretty easy to remove. It has an auxiliary tank for expansion and a charcoal canister for fumes/emissions. The aux tank was removed first and the charcoal tank small enough to leave attached. The whole tank is strapped down by a metal strap with felt pads on it, and a metal seam on the tank supported/isolated with thick rubber bushings from the car body. Pretty cool.
With the tank removed the front trunk area became a lot more enlightening. Not a lot left up there - windshield washer fluid container, blower system for defrosters and heater/fan, and brake fluid reservoir. In the middle of the hole there you can see the steering column headed down towards the steering rack.
More vertical pic of the space:
The defroster valves are complicated looking. Their operation and air flow is controlled by levers and cables. No fancy electronic HVAC in the 70s baby!
Driver's side defroster and brake fluid reservoir. This front area is remarkably rust-free, and all of this stuff stays relatively clean and oil-free because the motor is on the other end of the car.
Despite not having electricity available the headlights can be manually raised with a knob on the back of the headlight motors. This is the only way to remove the headlight assemblies. Peek-a-boo!
I got the headlights removed but didn't get any pics. I also removed some interior bits. More pics next week hopefully!
Sunday, February 27, 2011
Friday, February 25, 2011
Help me pick a color!
I set up a poll so you can vote on which color you think I should paint the car.
This site has a great overview of the colors with saple pics:
http://homepage.mac.com/markd/914/colors.html
This site also has a breakdown of all Porsche 914 colors throughout the model's life:
http://www.p914.net/p914_paint.htm
You can select from different years in the left frame on that site and view pics of 914s in each color by clicking on the color name! Very cool.
One more site showing the colors and their color codes and even Pantone equivalents:
http://members.rennlist.com/chuxter/914Colors.htm
In the poll I put up some of my favorites, but if you think of another let me know. The 914 came from the factory in some awesome funky 70s colors.
I am trying to use a Porsche color but I could be persuaded otherwise :-)
Week 3 - Good, Bad and Ugly
So many pieces are off of the car now it looks a lot more like a shapely piece of modern rusted metal art than a car.
I had a lot of help again in pulling off car parts and draining beer containers!
The main objective this week was to get the front bumper pieces and the rocker panels off. Especially the rocker panels, and much of the car's rust damage centers on these areas.
Even with the rocker panels on, just moving or tapping on them caused dirt to fall out of the spaces between the panels and the chassis. I think car companies learned a lot about how to not build gaps underneath car bodies from cars like this. The rocker panels are riveted to the body on top, with (rusted) screws underneath, with a couple of screws in the front and rear wheel wells. So the first task is removing the wheels to get at those wheel wells.
Here's some dirt that fell just from tapping the rockers and drilling out some rivets...
Here's the passenger seat spot. The seat brackets are rusted out where they connect to the floor. You should see the driver's side...new rear floor pan is readily available online.
The driver side floor pan was already replaced by apparently a complete redneck. Metal plate welded to the spot where the floorpan was, brackets welded on and a brace. Nice!
Here's the driver's side rocker/dirt. You can see bondo/respray in non-matching silver paint on the door jamb area. Nice work Cletus!
Glamor shot of the interior. The floorpan (except for driver's seat area) is covered with about a millimeter thick layer of a tar-like sound-deadening/insulating material. This will have to be scraped off/replaced. Of course they sell pre-cut sheets of replacement tar that will fit exactly after this is all cleaned up and re-painted.
The front bumper trim and valence was removed pretty easily once the wheels were off. And the last bit of carpet in the front trunk.
Those circles in the front are just little plugs that will be removed to allow air to flow to a front-mounted oil cooler when she gets her new heart.
With the rear wheels removed you can see the motor and transmission clearly as well as the rusty suspension arm and exhaust. Lots of vertical clearance is afforded by the bodywork back here. And look - rear disk brakes; not bad for 1972.
Passenger side rear suspension. Note the four-bolt hubs which will be replaced by 5-bolt hubs suitable for larger and nicer 911 wheels, brakes and suspension bits.
Now the UGLY. The passenger side rocker panel space was harboring a solid chunk of dirt between the frame and the panel. No wonder these jack areas just hold moisture and rust out!
It's mostly just surface rust...(only a flesh wound!)
Except for the jack post itself! This is supposed to be a pyramid-shaped metal piece welded to the body with the jack post extending from the top of the pyramid shape. The pyramid just crumbled like dry paper when I touched it with a screwdriver. And yes, perfect new pieces are available for all of the comon rust areas. This ain't new to 914 owners.
Here's a view of the passenger jack post from below. The left is towards the front of the car. You can see the pyramid shape of the jack post support (which looks like bubbling cheese). On the left is a vertical support that was trapping and holding all of the solid dirt between itself and the jack support. On the right is the rusty hole leading directly into the engine compartment/battery area.
It's hard to describe how much dirt was packed in there, even with pictures!
The seat back is now removed along with a thick (about 2mm) rubber-like pad that provided heat- and sound-deadening for the passenger compartment from the engine bay. All of the discoloration is just the glue that held the pad onto the firewall.
We found lots of broken glass back here. No wonder the rear window looks so nice now, it's been replaced!
interior is disappearing!
We removed the engine cover as well. The carburetor air cleaner box makes a great coaster.
I moved the tractor from the front of the shop to the rear so I could store the pieces we're removing from the car in the front of the shop.
It's like a half-century-of-vehicles parking lot up in here.
Here are most of the parts taken off of the car so far.
This post is pretty late as all this work was done last weekend. The next post will be pretty soon as it's the weekend again and more weekend warrior car disassembly will commence!
Monday, February 14, 2011
Week2 - More Demolition
It's so much easier to destroy than to create. Taking every little piece off of a car is very time-consuming but in a really good way. It's almost zen-like removing pieces to see what's behind them, or determining how they were assembled so as to not break them when you take them apart. Then you start pricing all of that rubber trim you just destroyed - even though you know it had to be replaced anyway because it was cracked - you start getting worried about how much something is going to cost just to put it back together. And you really really hope you can remember where all the little pieces go and how they go back together.
When people buy a fully assembled restored car there are so many details that someone took care of that you don't have to worry about. I know that glaringly now. If you have the means, I highly recommend picking up your cars already restored so you can play with them right away!
For the other 99% of us it's a long process of deciding what needs replacing and what just needs a little elbow grease. In general I'm going to replace every soft item and polish or clean or repaint every hard item that I can. (That's What She Said (TM))
Sadly some of the soft stuff costs a lot, probably because they don't make new trim for a 1972 914 anymore...
Anyway this week saw a lot of progress. I had some helpers on Friday with my work mates spending part of their day off with me tinkering with the car (many thanks guys!). We made incredible progress. If you are local feel free to drop by and take something apart.
Here are some pics of our progress:
Always start off with essential tools - flashlights, screwdrivers, pliers and PBR. Well we also had Shiner Bock and Stella in the cooler...
Oh and see that wire in the trunk? That's the entire rear wiring harness minus the engine wiring. Love the 70s! No computers or backup cameras or parking radar or subwoofers or any of those non-driving essentials.
While I had the help of some strapping young men (well, younger than me) I decided it would be good if we took the heavier pieces off . So after we got warmed up taking chrome trim off of the rollbar area, the lone side mirror, and the side markers and turn signals off the front, we focused on the hood and doors. Before taking out the doors we took off the interior side panels and all of the side window glass. Hey all these parts have VW stamped on them!
The driver's door had a couple of odd pieces missing like the little bar that keeps the door held open with a spring and cam system. It also had a stripped bolt that was a pain to remove...pretty sure this door has been taken off before.
Which brings up a disturbing part of taking apart an old war horse like this one. Someone's been there and done that and probably made a crappy repair to boot. Every piece I take off I'm afraid to look sometimes because there might be something nasty underneath.
Yarr - They took me lights!
Quality wiring job I tell ya. What's scary is that same person probably had their way with the wiring somewhere inside the car as well. I'm going to need to get one of those sandblaster boxes to get some of the rust off of things like that brake backing plate that looks like the side of the Titanic.
The engine bay in all of its glory. Lots of missing parts, mostly hoses from the hot air blowing system. These cars had no A/C and the cabin heat was provided by blowers that route engine heat into the cabin. Factory fuel injection was replaced with a single Weber carburetor. Say, that looks like rust over by the battery tray...
Oh yeah. Another common issue is that owners let their batteries spill acid in the engine compartment that tends to eat through the metal in the floor. It's certainly common enough that they make full replacements for that too...note the not-stock battery tray that's been welded into the side wall.
The lesson is, you modern kids buy Optima or similar sealed batteries for your little mid-engine cars...
It's only a flesh wound!
The horn button came off easily - too easily. Ha. Cool gauges though. Tach in the center like a real Porsche. No the odometer is not accurate. Have you seen the rest of the car?
Not much room to work on that motor from above! Luckily a lot of the stuff is easily accessible from below. Good excuse for a lift too right honey?
Being up on jackstands brings a lot of the work closer to the male of the species. Lift? Anyone?
Removed the fog light covers. Surprisingly they were plastic. There were no foglights. The bumper and front valence appear stock though a bit beat up and look to have been resprayed with a rattle-can. With lots of coats.
Nice simple interior in need of some fixin. It won't take much to make it look spiffy though. It's a lot easier than say restoring a Bentley with handcrafted wood and leather ;-)
Happy Valentines Day! Until next time...
When people buy a fully assembled restored car there are so many details that someone took care of that you don't have to worry about. I know that glaringly now. If you have the means, I highly recommend picking up your cars already restored so you can play with them right away!
For the other 99% of us it's a long process of deciding what needs replacing and what just needs a little elbow grease. In general I'm going to replace every soft item and polish or clean or repaint every hard item that I can. (That's What She Said (TM))
Sadly some of the soft stuff costs a lot, probably because they don't make new trim for a 1972 914 anymore...
Anyway this week saw a lot of progress. I had some helpers on Friday with my work mates spending part of their day off with me tinkering with the car (many thanks guys!). We made incredible progress. If you are local feel free to drop by and take something apart.
Here are some pics of our progress:
Always start off with essential tools - flashlights, screwdrivers, pliers and PBR. Well we also had Shiner Bock and Stella in the cooler...
Oh and see that wire in the trunk? That's the entire rear wiring harness minus the engine wiring. Love the 70s! No computers or backup cameras or parking radar or subwoofers or any of those non-driving essentials.
While I had the help of some strapping young men (well, younger than me) I decided it would be good if we took the heavier pieces off . So after we got warmed up taking chrome trim off of the rollbar area, the lone side mirror, and the side markers and turn signals off the front, we focused on the hood and doors. Before taking out the doors we took off the interior side panels and all of the side window glass. Hey all these parts have VW stamped on them!
The driver's door had a couple of odd pieces missing like the little bar that keeps the door held open with a spring and cam system. It also had a stripped bolt that was a pain to remove...pretty sure this door has been taken off before.
Which brings up a disturbing part of taking apart an old war horse like this one. Someone's been there and done that and probably made a crappy repair to boot. Every piece I take off I'm afraid to look sometimes because there might be something nasty underneath.
Yarr - They took me lights!
Finally got that stuck bolt out and the driver's door off. I also got the car up on jackstands which was an effort. The main problem is that the normal jacking point (a square hole in the door sill) is so rusted out that it does not lift the car. This is a typical issue with these cars - moist debris from the road gets caught up in the exposed jack point area and just rusts it to death. Yeah they make replacement pieces for all that.
The driver's door jamb is rife with bondo and repaint too so I am wondering how far the damage goes...
Ran out of time to take the wheels off, that'll be the very next task. I partly wanted it to sit on the stands for a while with the wheels on in case the jackstand points collapse and the car could have a chance to land on its wheels.Now that she's on jackstands I can take some pics of the underside. Note the classy exhaust strap made out of bailing (or some sort of) wire on the driver's side. The rear exhaust mounts hang right off of the transmission.
The previous owner power washed the motor but you can't hide ugly for too long.
This is my favorite - freaking hose clamps holding onto this drive axle boot. Really? Really? Really. Thank goodness those are gonna get replaced with some 911 parts along with the motor. Quality wiring job I tell ya. What's scary is that same person probably had their way with the wiring somewhere inside the car as well. I'm going to need to get one of those sandblaster boxes to get some of the rust off of things like that brake backing plate that looks like the side of the Titanic.
The engine bay in all of its glory. Lots of missing parts, mostly hoses from the hot air blowing system. These cars had no A/C and the cabin heat was provided by blowers that route engine heat into the cabin. Factory fuel injection was replaced with a single Weber carburetor. Say, that looks like rust over by the battery tray...
Oh yeah. Another common issue is that owners let their batteries spill acid in the engine compartment that tends to eat through the metal in the floor. It's certainly common enough that they make full replacements for that too...note the not-stock battery tray that's been welded into the side wall.
The lesson is, you modern kids buy Optima or similar sealed batteries for your little mid-engine cars...
It's only a flesh wound!
The horn button came off easily - too easily. Ha. Cool gauges though. Tach in the center like a real Porsche. No the odometer is not accurate. Have you seen the rest of the car?
Not much room to work on that motor from above! Luckily a lot of the stuff is easily accessible from below. Good excuse for a lift too right honey?
Being up on jackstands brings a lot of the work closer to the male of the species. Lift? Anyone?
Removed the fog light covers. Surprisingly they were plastic. There were no foglights. The bumper and front valence appear stock though a bit beat up and look to have been resprayed with a rattle-can. With lots of coats.
Nice simple interior in need of some fixin. It won't take much to make it look spiffy though. It's a lot easier than say restoring a Bentley with handcrafted wood and leather ;-)
Happy Valentines Day! Until next time...
Subscribe to:
Posts (Atom)